
Adaptive layout: lessons or straight into battle? And finally... download video lessons.
Hello, my name is Alexander Zelenin and I am a web developer.
I have often heard the opinion that layout is the domain of beginner frontenders. Although in fact this is the most important part of any (almost) web project. This is what users see first. Currently, high-quality layout (especially block design) in a large project requires a large number of different skills.
In this article I present a development plan for a layout designer
[large by click]
Of course, this is not a comprehensive and only correct scheme. There is a whole mountain of related skills, relevant technologies, and so on. Gradation is subjective.
I would like to immediately add that there will be no specific links to educational materials in the article. I will be glad to add additions in the comments.
What are we expecting?
First of all, it is necessary to understand what we expect from a person at each level. Your expectations may vary.
Junior- knows the main tags, can correct the content on a ready-made html site, knows how to format text correctly, inserts an embedded element (video from YouTube, Yandex map) without any problems, works through a version control system only for himself (master, 1 contributor). He can make up something simple from scratch, and it won’t even work (for him personally). In general, it is not an independent unit and requires leadership from above.
Middle- a more or less autonomous unit (or completely autonomous for small and medium-sized projects). A medium-sized website can be laid out well, and it will be displayed correctly in all current versions of browsers. Understands how template engines work and can use them (provided the rest of the code is provided). Able to plan and document their work and estimate deadlines. Understands the importance of maintaining code style. Understands why there are grid systems and CSS frameworks. Able to take all the necessary information from the designer’s layouts. Can interact with a small team, create branches and pull requests.
Senior- can design a block system for a large project. Knows how to avoid repetitions and problem areas when other developers use his code. Able to decompose complex problems and formulate tasks competently. Knows how to apply at least one development methodology (for example, BEM). Can make the project open as quickly as possible. Well understands several popular template engines. Able to write collectors and automate the process associated with it. Can conduct code reviews and supervise other code developers.
Let us now consider a little more specifically what each of the blocks at each level includes.
Junior
HTML- knowledge of basic tags and attributes. Understanding how to write it in principle.
Typography- Ability to format text. Text is the basis of almost any project. Inserting non-breaking spaces where necessary, highlighting in bold, italics, abbr, and so on. You can use a printer or similar service, but be able to understand the result.
Semantics- understanding that there are certain tags for certain tasks. Know how to choose the right tag.
Media- what types of media can be embedded into the page.
Iframe- embedding third-party widgets (video, audio, maps, etc.).
Audio Video- you can postpone studying, because partially solved using iframe. Understand what formats the browser can play, how to design the player, and so on.
Images- what graphic formats and in what form the browser perceives. Pros and cons of using certain formats.
Raster- jpg, png, gif. Understand the difference between formats and be able to apply what and where you need it.
SVG- you can postpone studying, because used less often than we would like. Understand the pros, cons, limitations, etc.
Fonts- you can postpone studying. This is actually quite a complex topic, and in general I would advise beginners to use system fonts. Be able to load fonts, optimize display, minimize rendering lag with custom fonts.
Table layout- optional. For those who want to create high-quality email newsletters in the future.
CSS 1- fonts, colors, alignment, sizes.
CSS 2.1- control of block behavior, positioning, full design.
Selectors- simple selectors for tag, class, nested element. Simple pseudo-selectors like:hover.
Naming- how to name classes so that it doesn’t hurt excruciatingly.
Block layout- break the image into conscious blocks, implement the blocks in HTML, and design them with CSS.
Browsers- you can postpone studying. What browsers exist, what is their difference.
Developer Tools- you can postpone studying. Use browser tools to understand display issues.
Text editors- what text editors there are for developers and why. SublimeText and Notepad++ are given as examples, as they are familiar to me. Be able to configure basic things in them, such as indentation, line breaks, and so on.
Version control systems- I personally consider the ability to use them, at least individually, for myself, to be very important. Understand why these systems are created and what they are.
Git- understand in general terms the task and principles of the most popular version control system.
Github/bitbucket- be able to use one of the popular platforms for git.
Checkout/commit/push/pull- basic operations for personal use.
Stash- for temporary storage of currently unnecessary data.
10 works- make at least 10 works in different designs. You can do tests, it doesn’t matter. It is important to be complete within the current knowledge.
Middle
CSS 3- gradations, shadows, anti-aliasing, filters, transformations.
Advanced selectors- elements following the defined one (+), defined by the count (nth-child), shadow-dom, before/after and so on.
Animations- optional. transition and animation. Smooth transitions, animations. Understand the limitations and disadvantages.
Grids- why they exist, how to build them, what ready-made solutions are available. For example, you can look at Flexbox grid or any other grid you find.
Frameworks (CSS)- why they are needed, how to use them. It is advisable to learn to use at least one well. Very useful for prototyping. Significantly improves the quality of the project in the absence of a design budget (not unique, but usable).
CSS preprocessors- you can postpone studying. Optimization of work, more beautiful and readable code. Variables, mixins, etc. Work with one or more popular preprocessors such as SASS, LESS, Stylus.
Media queries- you can postpone studying. Display the desired styles depending on the conditions (device, screen size, pixel density, print version, etc.).
Code style- understand why there are style conventions, study and start applying any (I recommend from AirBNB).
DRY/KISS/SOLID- you can postpone studying. Understand important development principles that significantly simplify further project support.
OOCSS- optional. Understand what object-oriented css is and what it is for. It is used in one form or another in many projects (albeit without understanding that this is it). Ideally, learn how to design. Can be great for large projects.
Documentation- understand what and how to document. Document. You can put it off, but be sure to study markdown in the future.
Planning- learn to estimate deadlines from a picture and determine the sequence of work.
Decomposition- you can postpone studying. Learn to break a task into subtasks. It's harder than it looks :-)
Setting goals- you can postpone studying. Learn to clearly describe tasks in text so that other developers, including those with less qualifications, clearly understand what needs to be done to complete them.
Flexbox- understanding of the model, ability to apply it fully.
Letter layout- optional. In general, the skill is not superfluous. Understand the features of mail systems, maintain a good appearance and not fall into spam (if it is not spam).
Polyfills- understand how to use the most current development capabilities while maintaining backward compatibility. Understand the pros and cons of this approach.
Cross-platform layout- understand what needs to be done to make the project look good not only under Windows, Linux and Mac, but also under SmartTV or PS.
Cross-browser layout- understand the differences in browser rendering and make them display the same. The CanIUse website helps a lot with this.
Mobile layout- you can postpone studying. Understand the limitations of mobile platforms. Use limited space wisely.
Optimization- you can postpone studying. Understand the “price” of certain techniques. Understand the phases of displaying a site to a user. - you can postpone studying. Optimizations related to size, cache, compression, resource pooling, etc.
Rendering- you can postpone studying. Optimizations related to post-load rendering speed.
SEO- you can postpone studying. At least a basic understanding of how search engines work. The ability to “help” the search engine figure out where to look and what is important.
Template engines- understand how you can reuse code, group elements and layout pages. It is highly advisable to learn both server-side and client-side rendering. This also includes templates in “pure” language (such as simple PHP inserts). We are not interested in the work “before” (dataflow) of the template engine.
PHP- you can postpone studying. Understand basic syntax and be able to make minor edits related to page design.
CMS- you can postpone studying. Find out what CMS exist and why they were created. Learn to write templates for at least one (I recommend Wordpress).
Javascript- you can postpone studying. Learn the basic syntax, understand how to attach simple handlers and carry out simple work with the DOM.
jQuery- you can postpone studying. Learn to save a lot of time for solving fairly typical problems using plugins for the most popular js library (after vanilla.js, of course).
NodeJS- you can postpone studying. Figure out how to run a simple server, distribute static and render on the server side. You can use Express or any other framework.
Assembly- optional. Learn how to assemble a project from a bunch of CSS / HTML files into what you need. I recommend that you familiarize yourself with at least grunt and gulp, as representatives of “different” camps.
IDE- optional. Learn why IDEs are needed and how to use them. Switch to using some IDE to save time. Important: learning an IDE is comparable to fully learning a programming language, and investing a lot of time in it may not be worth it. Personally, I use text editors (and only turn on the IDE for very large projects).
Branching- learn how to manage branches in git.
Merge- learn to merge branches with conflict resolution.
Fetch/Rebase- figure out what they are for, when to use them, and start using them as needed.
Graphic editor- figure out what they are and why. How do vector differ from raster? It is important to understand the editor at least at the level of “reading” the layout from the designer. Choose the right font, size, color, etc. Not by sight, but definitely. I recommend working with at least 1 raster (Photoshop) and 1 vector (Figma).
50 works- by the end of the stage you will have about 50 different works demonstrating skills from the areas studied.
Senior
Although this group seems small on the diagram, it is actually the largest. Because At this point, it is necessary to study everything that has been put off.
Adaptive / Responsive layout- understand the highest level and combine all the knowledge acquired so far. The project should look good everywhere and on everything (within reason).
Gradual degradation / Progressive improvement- understand what it is and why. Use.
Gitflow- be able to explain to other developers how to create branches, where to merge them, how to do a code review (layout, of course, not code).
BEM- optional. Understand a methodology that allows you to create unlimited large projects so that with minimal synchronization, different teams can use each other's blocks. There are other methodologies that give no worse results. By this point, you will know about them one way or another and can, if you wish, study them.
100 works- have a total of a hundred works demonstrating various acquired skills. In fact, this is all conditional. You can have one piece of work (consisting of various parts) in your portfolio, which will already show that you are not afraid of anything.
Conclusion
In fact, many of these topics are small. However, keeping a bunch of different factors in your head is very difficult. Over the course of 15 years, I communicated with less than ten layout designers (and programmers in general), whom I would classify as Senior (there were much more good layout designers and programmers).
Offhand, it’s quite possible to spend a year fully studying and practicing just layout from scratch (or more if you go into component design).
I hope that for those who are at the beginning of their journey, the diagram will tell them where else they can move, and that it is not necessary to immediately (or even not move towards it at all) jump into programming.
I also plan to create a full-fledged free course with a detailed discussion of each of the rectangle topics from the diagram. I will be glad to receive suggestions, reviews, wishes, and so on.
The course will probably be in the format of video lessons with full text and graphic duplication. If things go well, I’ll add links in the comments in the future. Add tags
Web design is not only an artistic aspect, it also contains some technical aspects. In particular, we are talking about the process of “translating” a drawn template into html and css code, which is called website layout. Website design layout has some of its own features, rules and nuances, which we will talk about in this section of the blog. Here you will find both theoretical information about the web page markup language HTML and CSS styles, as well as practical lessons on layout. The articles will discuss some situations that arise when designing a template, using specific examples with detailed explanations.
Also in the layout section of the site you will find posts with tips and tricks for future or beginning layout designers, notes with useful hacks and secrets for HTML and CSS layout, as well as reviews of software that is used for layout.
To somehow brighten up the design theme, let's look at another lesson on layout today - a lot of time has passed since the previous post about CSS hover effects. This note will focus on the issue of creating a link to email in html. All this is implemented using the usual A tag, which, despite all its simplicity, can be used not only to design hyperlinks, but also has several interesting nuances. The basic syntax looks like...
Very often on websites you could see changes in the design of links or buttons when hovered. A special pseudo-class:hover in CSS allows you to implement the task. Today we’ll look at some layout techniques that allow us to create this feature, and below we’ll publish a list of the most interesting of them (with brief descriptions/explanations). We will divide all options into: Effects for buttons and links. Hover in images. CSS libraries (connected separately). These groups are very arbitrary, because many examples...
In one of the previous articles, we wrote about a mini design trend in the form of adding bright background stripes under links and text on the site. A similar effect can also be found in modern illustrations for social networks that contain some kind of content. Today we decided to continue the topic and consider the issue from a layout point of view, that is, tell you how to underline text / links in HTML. One thing will help us with this...
Most classic websites on the Internet use a horizontal menu as the main navigation element. Sometimes it may contain various additional features - multi-level structures, icons for sub-items, a search block, complex lists, etc. Recently, the blog already had a small selection of stylish menus in PSD, and today we’ll look at 4 practical examples of how to make a drop-down menu using CSS + HTML. The information will be useful for novice developers and those who…
Earlier in the blog we already talked about linear gradients and at the same time gave examples of different generator services. Today we will try to put this knowledge into practice to create a beautiful background gradient using CSS. Plus, in the process, we will get acquainted with the interesting skew function for implementing transformations in CSS3. We can say that the basic idea of the background image was borrowed from the BrightMedia website, which is an excellent example of professional use of all the features of CSS3. True, we will not repeat...
On modern websites you can find a large number of graphics of various types: images of products, user avatars, pictures that form the design of pages, buttons, icons, logos, etc. And the larger the project, the more graphic files are used. When you open a separate page of the site in the browser, all its elements are loaded. Therefore, when there are too many graphics on it, loading speeds tend to slow down significantly. Which in turn,…
I decided to make rounded corners for the standard sidebar blocks on my website using CSS3. Previously, I remember, to implement this task, we drew separate pictures for each corner and combined them using several DIV blocks in HTML. Fortunately, now all this is easily specified in CSS styles. For certain layouts and themes (for example, women's), such CSS rounding looks much more interesting than straight, strict lines. In general, I had to...
With today’s publication I’m starting a series of articles about bold fonts. Initially I thought of posting all the nuances and questions on the topic in one place, but there was too much information. It's better to take it gradually. Therefore, before moving on to various reviews of fonts for creating Photoshop illustrations, I will consider issues related to layout. You will find a selection of fonts here: interesting bold, different bold and Russian thick fonts. Today I’ll tell you how to make words bold...
When designing websites, it is customary to use CSS (CascadingStyleSheets), that is, cascading style sheets. This is a set of tags that specify the basic parameters of page design (indents, fonts, colors), allowing you to create key elements of a website, keeping them in a certain style. For each HTML element you can define your own style, this is convenient, CSS saves time and effort. There are a number of Internet resources that are a kind of CSS constructors and make the work of a webmaster easier. We have already published...
Learning web development is a fairly broad topic, and you need to start with the very basics - HTML and CSS. Now on the Internet there are a lot of different courses, scanned books and tutorials for gaining knowledge. However, none of this will be as interesting to study as the HTML Academy project. This useful resource will help you learn the basics of web development / layout in a high-quality manner and in a short time. The resource is made in the format of an online school,…
,Block layout
As you may have guessed above, this article will focus specifically on block layout. If the previous article was an introductory one, now we will look more specifically at an example - how make a website from scratch. During my study of layout, I was looking for a detailed manual on how to lay out even the simplest html page step by step. In this article, I want to look at each line of code in as much detail as possible and explain the principles of working with html, so that anyone new to this business can understand it. I hope I can do it. 🙂
So, let's begin. For example, I took a simple prototype, it cannot be called a layout, a normal layout is drawn in psd format, but here it is in jpg. The main thing for us is to understand the principle of how to layout websites using block layout. To work with block layout you need to know not only html, but also css(cascading style sheets). During the series of articles on website layout, we are just going to study that set of CSS styles, which in the future will always help you layout almost any layout/mockup frameworks, because the principle is the same.
So, here is the layout (clickable).

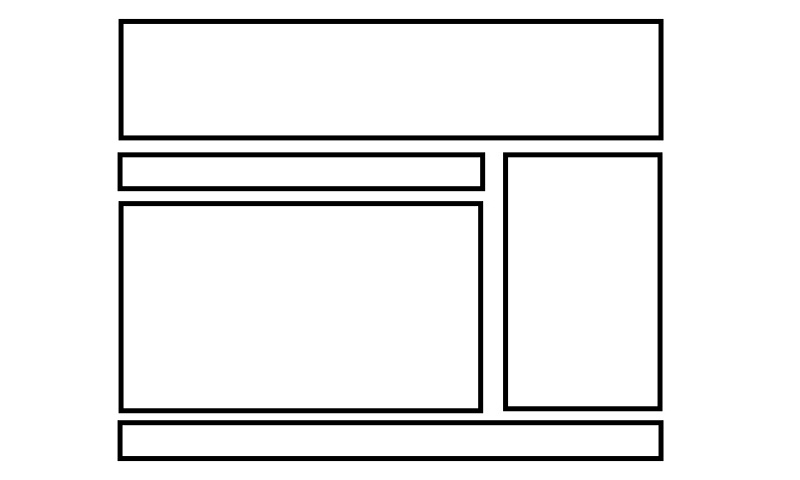
We see it has 4 logical parts:
- Website header (hereinafter we will call it header);
- Left column (hereinafter we will call it left sidebar);
- Right column (hereinafter we will call it content);
- Footer (hereinafter we will call footer);
So, of course, let's start with the header block. Our mockup is 1000 pixels (px) wide.
To begin with, I will say that layout is done using html tags. For example,
To get started, you need to create a new directory on your disk called, for example, myfirsthtml and in the code editor (I use sublime text 3, this is the newest version at the time of writing), create 2 files index.html and style.css. Now let's open index.html and start with the markup of our page, namely the header. But before making a header, we need to make the standard markup of any html page. Now I'll show you what I mean.
Now let's look at each line. Comments:
Line #1: The so-called doctype of the document is indicated here; it is required so that the browser understands in what form it needs to interpret the web page. There are 4 types of doctypes:
- XHTML 1.0
- XHTML 1.1
- HTML 4.01
- HTML 5
In turn, XHTML 1.0 is divided into subtypes: strict syntax (Strict) - does not allow any liberties, you cannot use the tag , ; Transitional - allows some liberties in the layout that cannot be used with a strict one; containing frames (Frameset). XHTML 1.1 is not divided into any subtypes, it is the only one, the developers even prophesied that it would gradually displace HTML, but if you read about it in more detail, then HTML developed from version 4 to 5, and the XHTML standard suspended its development, but still You can rarely find projects that have this particular doctupe specified.
HTML 4.01 is also divided into 3 types: strict syntax (Strict), transitional (Transitional) and containing frames (Frameset).
And finally HTML5 for all types of documents, the most universal. In the future, we will have a large number of articles with this doctype. I make all my new projects using it. But let's not get ahead of ourselves, now we are analyzing HTML 4.01. In this example, we use Transitional; it is very suitable for beginners.
Line #2: open tag it comes immediately after the doctype and includes absolutely all the html code, at the end of the document there is a closing tag.
- page title
Page title - page description
- keywords separated by comma
- and a lot of other meta information.
After
follows tag . This is where we will be laying out our website. Everything within this tag will be displayed directly in the browser.So we have completed and analyzed the standard page markup using html4. I will complete this lesson, and I will tell you how to lay out the main elements using application in the next lesson, which I will write in the coming days. Don't forget to add to
Good day, dear readers. Website layout is an interesting business once you start to understand it. The only problem is finding really good learning materials. At first, the code may seem like an absurd set of symbols, but once you master the secret knowledge, it turns into a fairly simple and understandable algorithm, and also begins to generate income and moral satisfaction.
Today we’ll talk about what html block layout and css are. The magical programming language will become less scary. I hope that by the end of the article you will have learned to see some elements of the code and will be able to make a firm decision for yourself whether you should get involved in all this.
Why are you luckier than layout designers who started working a long time ago?
There are two types of layout: block and table. At the dawn of time, layout was built in the form of tables. At first, only one, large one, was created.

The head, the main part, was built into it. One that includes a logo, some basic information such as telephone numbers, and so on.


Main content part. The text of the article, an introductory greeting, or something else.

The footer is located at the bottom. It is still used today. As a rule, small links to contacts, vacancies, and “About Us” information are inserted here. They can attach the dates of the resource’s existence or simply the magic word “copyright”, with which developers hope to indicate or protect their copyright. Its use as a horseshoe hanging over the door can only scare away ghouls, although they, as a rule, do not look into the footer.

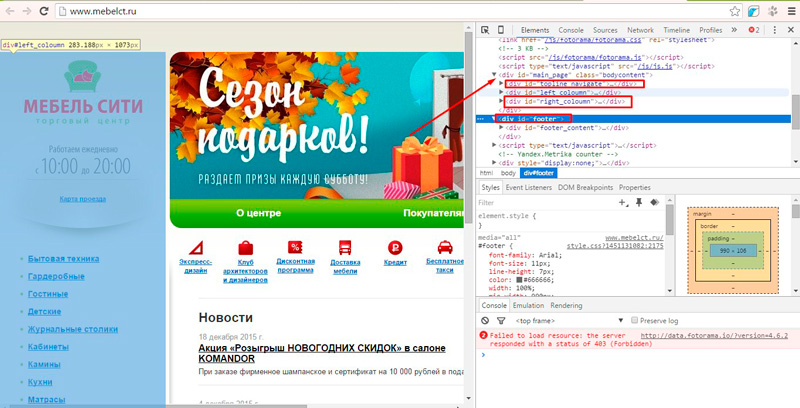
A little later, new standards appeared. Tabular layout was replaced by block layout. The “div” tag is block layout. You can look at the code of any site. Right-click and select View Element Code. Take a look at my screenshot. There is a block of the main page, footer, left and right columns. They are all signed.
Modern websites are built from blocks; I’ll show you a schematic example so you can understand. The difference here is rather in the page code. You see, there is no main sign. Blocks placed in one or another part. Sometimes they can overlap each other or combine several elements, but one extra element (the large table) has disappeared.
The blocks are designed using CSS, which is a special programming language. It is difficult to get confused in it, it is less cumbersome than when using a table layout, everything is quite logical, clear and convenient for the layout designer. Thanks to blocks, you can solve more problems, it is much easier to edit documents, and pages load much faster.
Step-by-step instructions: how websites are made
Let's take a step-by-step look at how a portal turns into an electronic resource. There's nothing complicated about it. Yes, you will have to make some effort to study, but this will bring not only moral satisfaction, but also a stable income. Layout is a business that not many people get involved in.
More than 80% of people simply look at an incomprehensible set of symbols, remember the school mathematics curriculum: logarithms, differentials - they go crazy, get scared and forget about this topic: “I’d better go and learn Chinese, it will be easier.”
You have already seen some algorithm and are convinced that there are repeating elements in the character set. This is great and, you see, it’s not so scary.
Let's now see how the website is created. First, designers work in Photoshop. They get something like this picture. While this is just a photograph, however, it has its differences.

It is produced in a special Photoshop format, such as notepad txt or Word doc. From psd, as this format is called, blocks are cut out. There is a special button for this in the menu on the left.

After the document is cut. It can be “Exported for the web” and as a result, an images folder appears on the computer, which the layout designer uses to distribute pictures throughout the site.

I made this option in a minute, it is not correct. I just wanted to show you an approximate result. You can download an electronic version of my psd layout ( download ) and try to make your own, correct version, see what pictures are useful for placement and how you will cut them out. At the same time, you will try to work on the template yourself in Photoshop.
For beginning layout designers and designers, this will be not only interesting, but also useful. Change colors, rearrange elements, modify the template and see what looks good and what changes you don’t like.
Your first site. Layout will take only five minutes
You can work on the layout itself in Notepad++. Today I will not touch on the Adobe Dreamweaver program, because... This is the topic of a separate article, but I note that it was created specifically for layout designers.
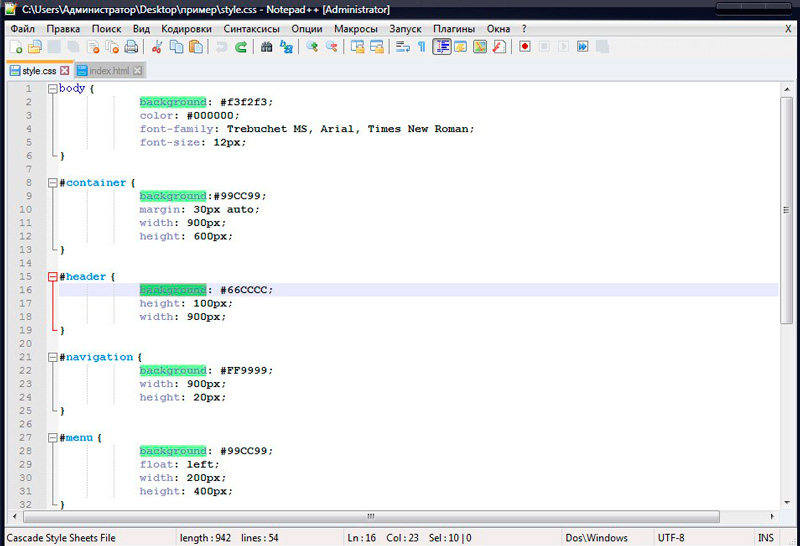
Work on a website usually does not begin with the creation of a style.css file, but I think that this will be more interesting for you. This is the main document that describes exactly what your portal will look like. It's simple. You don't even have to learn English.

Background is the background color.
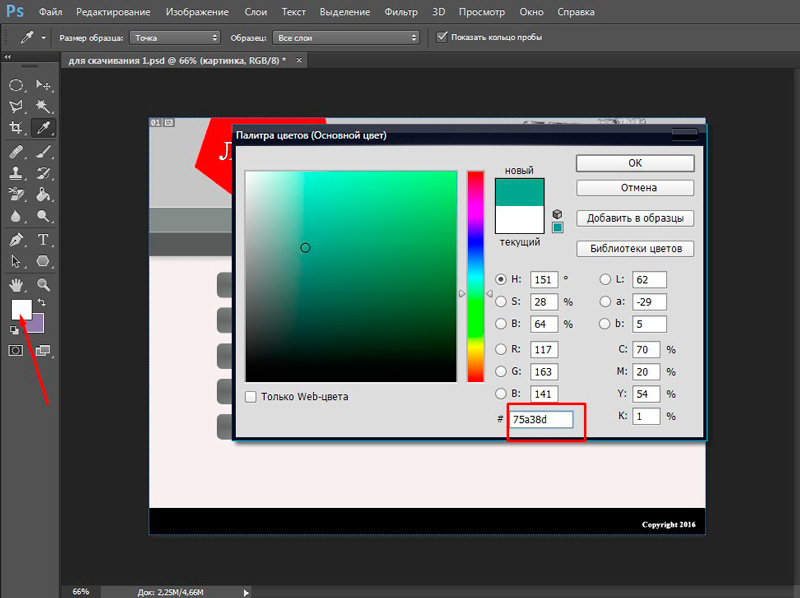
By double-clicking on the color palette in Photoshop, you can find out other colors.
This is what an html document with a text component will look like. Already familiar menus, bodies and containers... the h2 tag should also be familiar to you. These are the headings. Write your words in them.
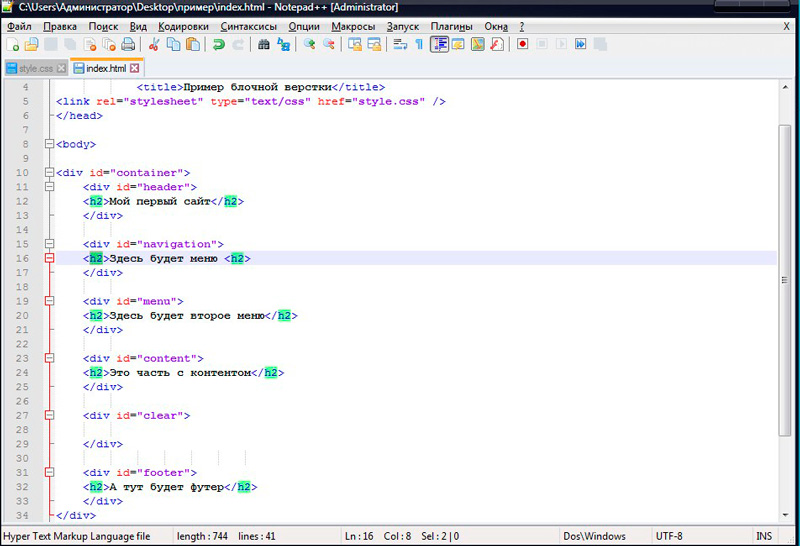
Download these two documents into one folder and open with Notepad++, then edit the color and text, then run index.html from any browser ( download ).

The result will be something like this.
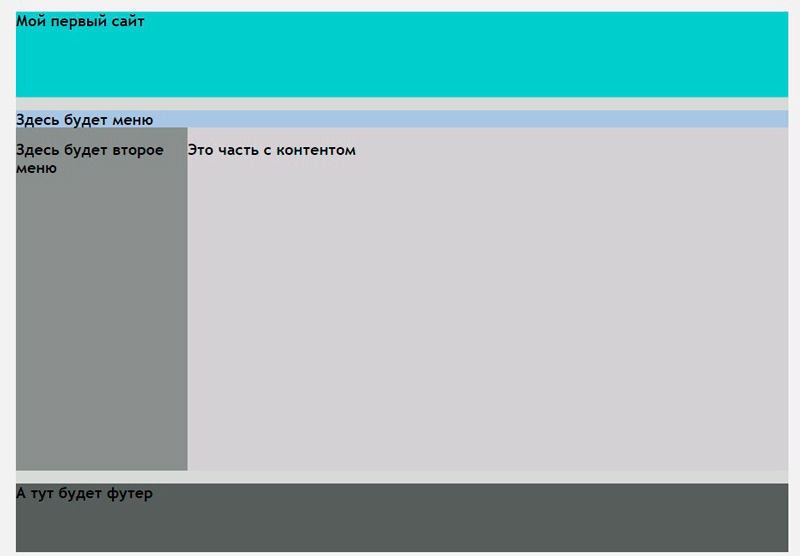
Congratulations. This is your first page on the Internet! You did it, you succeeded. Naturally, instead of color, you can insert a picture that was cut out from Photoshop into the images document. To do this, you just need to specify the path. As you can see, there is nothing super complicated here.
And finally... download video lessons
As I already told you, the most difficult thing in layout is finding good training materials. I myself started with books and only two weeks later I was able to make my first index file. Just so you understand, without a style sheet (CSS) it will look like this.

Agree, it’s not impressive at all. Therefore, I recommend that you learn the basics through video courses. Below I have placed links, by clicking on them you can download free html and css lessons. They allow you to achieve good results faster. In addition, reading requires much more willpower than watching interesting videos.
- Html - lessons for beginners .
- Css - lessons for beginners .
- Free mini-course on website layout .
I wish you success in your endeavors. I am sure that very soon you will begin not only to study, but also to work online, and also implement incredible projects!
If you liked this article, subscribe to the newsletter and receive more useful materials to improve your own skills!